Lupine Publishers Group
Lupine Publishers
Menu
ISSN: 2637-6636
Case Report(ISSN: 2637-6636) 
Management of Subgingival Incisor Fractures with a Diode Laser Volume 2 - Issue 1
John R Christensen* and Linwood M Long
- Adjunct Associate Professor, School of Dentistry, USA
Received: September 04, 2018; Published: September 10, 2018
*Corresponding author: John R Christensen, Adjunct Associate Professor, School of Dentistry, Chapel Hill, NC, USA.
DOI: 10.32474/IPDOAJ.2018.02.000127
Abstract
Management of subgingival fractures of incisors is difficult. This case study introduces the concept of using a diode laser as another tool in the treatment of fractured maxillary incisor teeth. Two cases illustrate the success of using a diode laser to manage the two problems of marginal access and hemorrhage in subgingival fractures.
Keywords: Subgingival Fractures; Trauma; Diode Laser
Introduction
Dental trauma creates some of the most demanding situations the clinician will face in the office. The patient is injured, scared, and wondering if they can be whole again. The parent is frightened, fighting guilt, and wondering what the outcome will be. Subgingival tooth fractures of maxillary incisors start a cascade of questions in the clinician’s mind. Are the pulpal tissues exposed? How far do the fractures extend? How do I restore this tooth, and will I need help from other dental specialists? The introduction of the diode laser has answered many of these questions. Many cases involving subgingival fractures of incisor teeth can be successfully treated with excellent results with the addition of the diode laser to traditional management techniques. There are three basic treatments for sub-gingival crown fractures reported in the literature. The first is orthodontic extrusion [1]. One considers orthodontic extrusion when the fracture is below the gingival margin and the lack of access compromises the integrity of the gingival margin of the restoration. Orthodontic extrusion is also indicated when the biologic width will be compromised with a restoration. The clinician must decide how to move the tooth in relation to the alveolar bone and crest. Simple extrusion will suffice if the intent is to extrude the tooth to gain access to the fracture margin. After the tooth has been extruded, a gingivectomy procedure will give the clinician access to the entire margin. If the intent is to extrude the tooth out of the alveolar bone to gain access to a crown fracture or near crown-root fracture the plan must include rapid extrusion. Rapid extrusion is used to move the tooth out of the alveolar bone to gain access to the fracture.
The result will be a tooth with a shorter crown-root ratio. In cases with normal to long root length this treatment will result in a restored tooth with an adequate but short crown root length. In cases of teeth with short root length, this treatment may not be indicated because the root length will be inadequate for the tooth to function in occlusion. A disadvantage of orthodontic extrusion is that additional treatment (orthodontics and sometimes endodontics) is required before restoration of the tooth. Another disadvantage is that it generally requires 4 to 8 weeks of treatment time [2]. Some recommend 4 weeks of retention time for every millimeter of tooth extrusion [3]. Lastly, the clinician must plan how to address the emergence profile of the extruded tooth. Depending on the amount of extrusion, it may be difficult to mimic the emergence profile of the uninjured tooth. A second treatment suggested for subgingival fractures is intra-alveolar transplantation. Intraalveolar transplantation is indicated when the fracture extends to a point that access to the margin is difficult even if the tooth is moved orthodontically or if orthodontics is not indicated.
In some cases, it may be important to access the margin earlier than the 4-8 weeks it takes for orthodontic movement. The clinician plans on how far the tooth must be transplanted prior to the procedure. The tooth is gently luxated to minimize damage to the periodontal ligament and surrounding structures. After the tooth has been luxated it is moved until the fracture is easily accessed. The tooth is splinted in position with a light, flexible splint like the technique used in trauma management. After a period of healing, the clinician can access the margin of the fracture and create an ideal margin [4]. 1 case report describes how a tooth was completely removed, restored outside the mouth, and reinserted like auto transplantation [5]. The advantage of this approach is twofold. First, the margin of the fracture is easily accessed and restored. The second advantage is the crown root ratio of the tooth remains unchanged. There are disadvantages to this approach (as well as the intra-alveolar transplantation). First, the surgery must be conducted in an atraumatic manner to avoid additional injury to the PDL. The tooth has already sustained an injury and it is imperative to minimize further injury to the periodontal ligament cells. Additional injury will result in ankylosis and the tooth will succumb to replacement resorption.
The other disadvantage is the operator must be well organized to minimize treatment time outside the mouth. As in traumatic avulsions, extraoral time is a factor in how the tooth will recover. In some cases, the extent of the fracture and the number of fractures may result in a situation where the only logical treatment is to remove the tooth. If there is too much damage, orthodontic extrusion or intra-alveolar transplantation are not enough to restore the tooth in a reasonable fashion [6]. Tooth removal is not without complications. Depending on the age of the patient, loss of alveolar bone will compromise prosthetic tooth replacement. In these cases, decoronating, substitution, or auto transplantation can be considered but each have several important considerations that limit these options. The diode laser was introduced to dentistry in the mid-1990s. Diode lasers produce light wavelengths in the 800 to 980 nm range. The wavelength of the laser beam determines the absorption characteristic in biologic tissues. Diode lasers are wellabsorbed by the primary components of gingival tissue; hemoglobin and pigmented tissue. Bone and enamel are not well absorbed so there is little damage or change to hard tissues. Ideally the clinician matches the wavelength of the diode laser to the tissue to provide greater cutting precision with minimal collateral damage.
The removal of soft tissue with a laser is called ablation. The energy of the beam is absorbed in the cell and transformed to heat. At a certain temperature, the cell vaporizes, and the tissue is “cut” by the laser. The diode laser provides many advantages over other techniques to remove soft tissue. First, surgery can often be performed with a strong topical anesthetic. Other advantages include improved hemostasis, reduced intraoperative and postoperative discomfort, decreased postoperative swelling, reduced need for sutures, and decreased bacterial count at the wound site. The disadvantages of laser surgery include slower tissue cutting, delayed healing, and reduced surgical precision. This case report will introduce the concept of using a diode laser to manage the complications of subgingival fractures of teeth. The authors have found that the use of a laser provides better access to the margin of the tooth with reduced hemorrhage. The clinician can restore the tooth with confidence in the marginal integrity of the restoration.
Case Report
Case 1
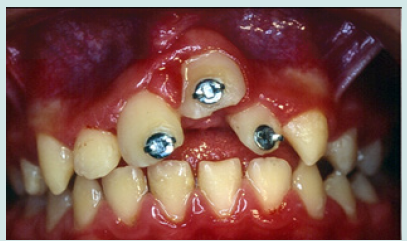
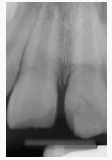
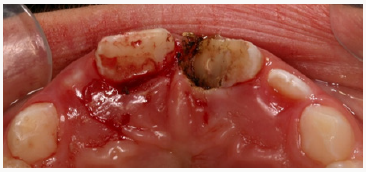
A 9.3-year white male presented to the office with a crown fracture of the maxillary central incisors. ET was on the playground when his gym instructor fell on his head. The fall drove ET’s face and teeth into the concrete. The teeth were shattered. The mother called and was instructed to bring the patient to the office. The accident occurred at approximately 11 am and the patient was seated at 11:55 am. The health history and trauma history were reviewed. A trauma sheet was started. Examination revealed a slight abrasion under the lower lip but no other soft tissue injuries. After checking all the teeth, it was determined that the maxillary right central incisor had an uncomplicated crown fracture and a subluxation injury. The maxillary left central incisor had a complicated crown fracture with multiple fractures and a subluxation injury (Figures 1a & 1b). 3 periapical radiographs were obtained. The 2 central incisors had open apices with immature root development. The fractures appeared to approximate the root on the left central incisor. The patient was anesthetized with 2.0 ml 2% xylocaine 1:100,000 epinephrine. The teeth were isolated with cotton rolls. The maxillary right central was treated first. The tooth was etched with 30% phosphoric acid and a dent in bonding agent was applied to the tooth. A flowable composite was placed to seal the dentinal tubules and protect the tooth. A final restoration was planned for a later date.
Figure 1a: Patient ET fell on the playground and suffered an uncomplicated crown fracture on the maxillary right central incisor and a complicated crown fracture on the maxillary left central incisor.
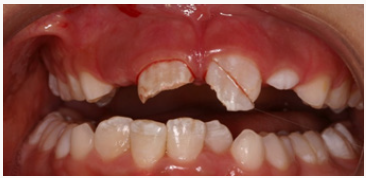
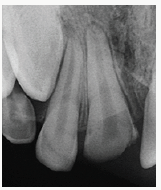
Figure 1b: Multiple subgingival fractures are evident clinically and radiographically on the maxillary left central incisor.
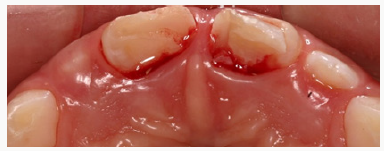
Figure 1c: Multiple subgingival fractures are evident clinically and radiographically on the maxillary left central incisor.
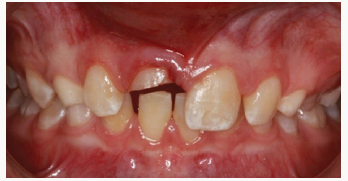
Treatment for the left central incisor was more complicated. Several fragments of tooth were removed to provide access to the coronal pulp tissue. A Cvek pulpotomy was performed on the tooth to a depth of 1mm. Calcium hydroxide powder was placed on the pulpal tissue to a depth of ½ mm. Dycal (Dentsply, York, PA) was placed over the calcium hydroxide powder. The tooth was etched with 30% phosphoric acid. Dentin bonding agent was placed and a flowable composite was used to seal the pulpotomy. The last fragment of tooth was removed at this point. It had been left in place during the pulpotomy because it was felt the hemorrhage from the depth of the point of fracture would be difficult to control and would compromise the Cvek pulpotomy seal. Two possible treatments were considered. The first was to dismiss the patient and have him return to restore the central incisors. The disadvantage of this solution was that the soft tissue repair process would begin, and it would require removal of healing tissue to access the gingival margin of the fracture. This would be difficult to do and there would be a great deal of hemorrhage. The second solution was to use a diode laser to access the margin of the fracture and control the hemorrhage. Both would be a significant advantage in restoring the tooth. A diode laser was used to remove tissue until the margin could be clearly seen. Hemorrhage control was excellent, and restoration could be completed with minimal worry of contamination (Figure 2). A central incisor crown form was used to restore the tooth. A crown form provides a dense and complete fill in addition to simulating tooth size and shape. An appropriate size crown was selected. The crown was fit and cut repeatedly to establish an ideal margin.
Figure 2a: A diode laser was used to expose all the margins of the fracture. Note the excellent hemorrage control.
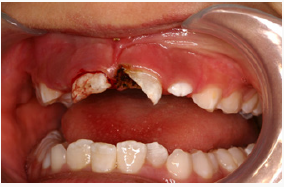
Figure 2b: A diode laser was used to expose all the margins of the fracture. Note the excellent hemorrage control.
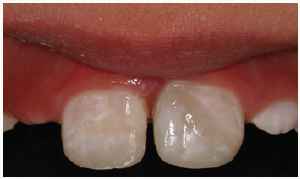
Caulk TPh3 resin shade B1 and A2 (Dentsply Caulk. Milford, DE) were used to fill the crown form. The margins of the tooth were cleaned thoroughly, and 30 % phosphoric acid was applied to the entire tooth including margins. A dentin bonding agent was applied, and the crown form was fit in place. Care was taken to place the crown form as close to the margin as possible to avoid over or under filling the restoration. After the resin was set and finishing procedures were started, the facial surface of the resin was cut with an inverted cone bur. The cut out areas were designed to mimic the variegated surface of the central incisors. They were filled with a white opaque sealant material and the restoration was polished. Periapical radiographs were obtained (Figure 3). The margin was very good, and the patient was dismissed with post-operative instructions for care of the tooth and soft tissues and given a prognosis based on information gleaned from the Andreassen textbook on trauma. The patient returned for follow up examinations in 2 weeks (Figure 4) and 3 months. Periapical radiographs were obtained. The periapical areas of the teeth remained healthy and root formation continued both central incisors.
Case 2
Patient BS is an 11.7-year-old male. BS was riding his bicycle when he collided with a parked car. The accident occurred at approximately 5:45 pm. His mother called and reported the tooth fragment was in milk. The patient was instructed to come to the office and was seated at 6:25 pm. A trauma sheet was started, and the medical and trauma history were reviewed. Examination revealed all teeth were sound except for the maxillary right central incisor. It had a complicated crown fracture with two visible subgingival fractures and a mild subluxation injury. One of the fragments was detached and comprised most of the fracture. A smaller lingual fracture extended sub gingivally (Figures 5A & 5B). A periapical radiograph was obtained. Root development was complete with a slightly blunted root tip (Figure 5C). The lingual subgingival fracture appeared to extend beyond the CEJ. The patient was anesthetized with 1.2 ml 2% xylocaine 1:100,000 epinephrine and the tooth were isolated with cotton rolls. A Cvek pulpotomy was performed to a depth of 3 mm. Calcium hydroxide powder was placed to a depth of 1 mm and sealed with a layer of glass ionomer cement. The tooth was etched with 30% phosphoric acid and a dent in bonding agent and flowable composite were applied.
Figure 5a: Patient CS presents with complicated crown fracture of maxillary right central incisor. Note the larger fragment is detached.
A diode laser was used to gain access to the subgingival margins. The lingual fracture extended just beyond the CEJ but was about 1 mm above the bone level. Access was gained to all margins and hemorrhage controlled with the laser. The tooth was thoroughly cleaned, and the marginal areas lightly cleaned with a flame shaped diamond burr. The tooth was etched with 30% phosphoric acid and a dent in bonding agent was place on the etched areas and cured. The large fragment was bonded into position using a thin layer of A2 shade Caulk TPh3 (Dentsply Caulk. Milford, DE). Excess was removed with an explorer and the resin was cured. A decision was made to use part of a crown form to repair the lingual subgingival fracture rather than bond the small fragment into position. The crown form was cut to match the lingual fragment area. The area was cleaned, etched, and a dent in bonding agent applied. A thin layer of Caulk TPH3 was applied to the inside surface of the crown form and put in place with cotton pliers. It was pressed against the tooth with a plastic instrument and excess was removed. After the lingual area was completed the facial margin was beveled, etched and restored with Caulk TPh3 resin (Figures 6A & 6B).
Figure 6a: After using the diode laser to locate margins and control hemorrhage, the larger fragment was bonded on the maxillary right central incisor.
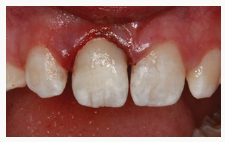
Figure 6b: An occlusal view showing the amount of tissue removed to establish necessary access to the lingual margin of the fracture.
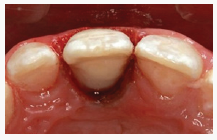
Figure 6c: Periapical radiograph showing good contour and excellent margins despite the depth of fracture.
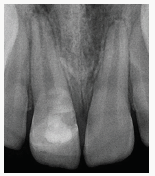
A periapical radiograph was obtained, and the marginal integrity was deemed to be very good (Figure 6C). The patient was dismissed with post-operative instructions for care of the tooth and soft tissues. The prognosis of the tooth was discussed based on statistics from the Andreassen textbook. The patient returned for follow-up observation in 2 days. Due to his deep impinging overbite, a fiberglass reinforced resin strip was bonded to the lingual of the upper central incisors to stabilize the tooth and restoration. A mouthguard was also fabricated with instructions to wear it while sleeping and when playing sports or participating in other outdoor activities. The patient was seen 1 month later for radiographic evaluation and again in 3 months. An endodontic consultation was obtained, and no treatment was recommended. He was evaluated again in 3 months and placed on 6-month intervals in conjunction with his regular recall visits.
Discussion
Treatment of teeth with fractures below the gingival margin is made easier using a diode laser. In addition to the two cases, the authors have treated several cases with similar long-term success. The diode laser should be considered in all cases of minor or major fractures where there are subgingival margins that are difficult to access.
References
- Koyuturk AE, Malkoc S (2005) Orthodontic extrusion of sub gingivally fractured incisor before restoration. A case report: 3-years follow-up. Dent Traumatol 21(3): 174-178.
- Bach N, Baylard J, Voyer R (2004) Orthodontic Extrusion: Periodontal Considerations and Applications. J Can Dent Assoc 70(11): 775-780.
- Minsk L (2000) Orthodontic tooth extrusion as an adjunct to periodontal therapy. Compend Contin Educ Dent 21(9): 768-774.
- Chung MP, Wang, SS, Chen CP, Shieh YS (2010) Management of crownroot fracture tooth by intra-alveolar transplantation with 180-degree rotation and suture fixation. Oral Surg Oral Med Oral Pathol Oral Radiol 109(2): e126-e130.
- Wang Z, Heffernan M, Vann WF (2008) Management of a complicated crown-root fracture in a young permanent incisor using intentional replantation. Dent Traumatol 24(1): 100-103.
- Andreasen JO, Andreasen FM, Andersson L (2007) Traumatic Injuries to the Teeth (4th edn.),: Blackwell Munksgaard, Copenhagen, Denmark, pp. 280-304.
Editorial Manager:
Email:
pediatricdentistry@lupinepublishers.com

Top Editors
-

Mark E Smith
Bio chemistry
University of Texas Medical Branch, USA -

Lawrence A Presley
Department of Criminal Justice
Liberty University, USA -

Thomas W Miller
Department of Psychiatry
University of Kentucky, USA -
Gjumrakch Aliev
Department of Medicine
Gally International Biomedical Research & Consulting LLC, USA -

Christopher Bryant
Department of Urbanisation and Agricultural
Montreal university, USA -

Robert William Frare
Oral & Maxillofacial Pathology
New York University, USA -
Rudolph Modesto Navari
Gastroenterology and Hepatology
University of Alabama, UK -
Andrew Hague
Department of Medicine
Universities of Bradford, UK -
George Gregory Buttigieg
Maltese College of Obstetrics and Gynaecology, Europe -

Chen-Hsiung Yeh
Oncology
Circulogene Theranostics, England -
.png)
Emilio Bucio-Carrillo
Radiation Chemistry
National University of Mexico, USA -
.jpg)
Casey J Grenier
Analytical Chemistry
Wentworth Institute of Technology, USA -
Hany Atalah
Minimally Invasive Surgery
Mercer University school of Medicine, USA -

Abu-Hussein Muhamad
Pediatric Dentistry
University of Athens , Greece

The annual scholar awards from Lupine Publishers honor a selected number Read More...


