Lupine Publishers Group
Lupine Publishers
Menu
ISSN: 2637-4668
Research Article(ISSN: 2637-4668) 
Failure Analysis of Thermo-Mechanically Treated (TMT) Bar During Bending Operation: A Metallurgical Investigation Volume 2 - Issue 5
Souvik Das*1, Sandip Thalukdar2, Goutam Mukhopadhyay1 and Sandip Bhattacharya1
- 1R&D and Scientific Services, Tata Steel Limited, India
- 2Product Technology Group, Tata Steel Limited, India
Received: August 23, 2018; Published: August 29, 2018
Corresponding author: Souvik Das, R&D and Scientific Services, Tata Steel Limited, Jamshedpur 831 001, India
DOI: 10.32474/TCEIA.2018.02.000150
Abstract
TMT bars means Thermo Mechanically Treated Bars made from medium carbon steel (Carbon 0.25 Max Wt. %) and are used in construction industry. Because of its corrosion and rust resistance features it is widely used in construction of buildings in humid areas as well as long lasting, high strength, quality construction. Quality aspects of these rebar’s are of significance as any inherent abnormality in the material could lead to unwanted productivity losses or quality claims. In this present study, rebar samples failed during bending operation were collected from construction end for understanding their quality aspect and potential causes of failure while bending. Visual observations of rebar sample (U-bend) longitudinal surface defects were observed in both the tension and compression zone. On appearance, metal folded over the rebar surfaces at an angle. Detailed microstructural investigation revealed that scale entrapment in defects. The above observations indicated that the defect was of lap type and which was generated during hot rolling process.
Keywords: TMT; Microstructure; Lap; Hot Rolling
Introduction
TMT ( Thermo-mechanical treated) rebar is the time proven match for reinforcing concrete structures on accounts of similarity in thermal expansion, ability to bond well with concrete and, above all, the ability to shoulder most of the tensile stress acting on the structure [1]. TMT bars means Thermo Mechanically Treated Bars made from medium carbon steel (Carbon 0.25 Max Wt. %) and are used in construction industry. Because of its corrosion and rust resistance features it is widely used in construction of buildings in humid areas as well as long lasting, high strength, quality construction [1]. Rebars are “hot rolled” from steel billets and subjected to on-line thermo-mechanical treatment in three successive stages:
Quenching
Hot rolled bar leaving the final mill stand is rapidly quenched by a special water spray system. This hardens the surface of the bar to a depth optimized for each section through formation of martensitic rim while the core remains hot and austenitic.
Self-Tempering
When the bar leaves the quenching box, the core remains hot compared to the surface. The temperature difference allows heat to flow from the core to surface causing tempering of martensite to “Tempered Martensite”. The core still remains austenitic at this stage.
Atmospheric cooling
This takes place on the cooling bed, where the austenitic core is transformed into ductile ferrite - pearlite structure. Thus, the final structure consists of an optimum combination of strong outer layer (tempered martensite) with a ductile core (ferrite + pearlite).
In actual industrial practice, however, undesirable microstructures such as coarse pearlite untampered martensite may develop as a result of improper heat treatment during rolling or during post operation [4-5].Sometimes foreign materials can get entrapped in the rebar during rolling operation which may lead to improper structure . The pipe, porosity, entrapment, and segregation in the input billets which may must also be within acceptable limits for proper rolling process. During rolling pass overfilling is the most frequent cause of defect in rebars, when material is forced out into the roll gap metal folds over and is rolled into the rebar surface during subsequent passes in hot rolling stage which leads to crack during operation. In this present work failure analysis of failed rebar samples during bending operations was carried out to find the geneses of failure.
Experimental Details
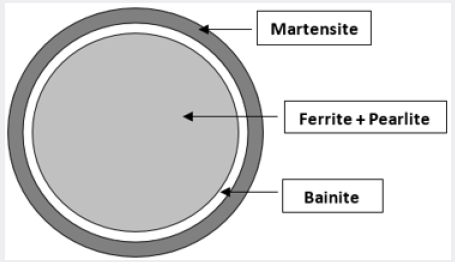
A 32 mm diameter rebar was taken for the study. This found broken during bending operation at construction end. Failed rebar samples that underwent breakage at the time of testing had been processed from medium carbon (Carbon 0.25 Max Wt. %), 130 X 130 mm square billets. Details of the broken sample are provided in Table 1. In some cases, according to the values of the controlling parameter, Austenite layer below the quenched skin transformed partially or completely to Bainite. As a result, three concentric layers in cross section formed are: (a) tempered martensite, (b) bainite, and (c) ferrite + pearlite (F+P) [2-3]. One pieces of rebar that had failed during bending was collected. The samples were cleaned with acetone to remove dirt and other adherent debris for visual examination and metallographic sample preparation. Transverse and longitudinal specimens were prepared from the failed end for conducting light microscopic examination (Figure 1). These samples were individually mounted in conductive copper-containing resin and polished by conventional metallographic techniques. Failed surface was examined under upright metallurgical microscope under un-etched and etched condition. Etching was done by 3% of Nital.
Visual Observation
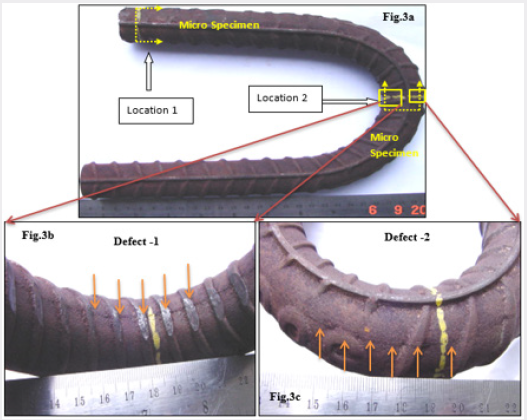
The U-bend sample was visually observed for surface defect identification. Surface defects were appeared on both side of bend sample (compressive and tension zone) [4-5]. Appearance of defects was that, metal folded over the bent sample at an angle (Figure 2). Based on appearance, nature of defect seemed to be of lap type.
Figure 2: Schematic diagram of cross section of TMT rebar showing different phases from center to periphery.

Metallographic Examinations
Figure 3a: Overall view of samples referred for analysis.
Figure 3b: Crack at compression zone of the rebar.
Figure 3c: Crack at tension zone of the rebar.

Transverse micro specimens were prepared from the locations marked in Figure 3. and studied under upright optical microscope at various magnifications. Macro dual zoom photographs of etched transverse micro specimens revealed uniform rim patterns in both the samples. Un-etched microstructure revealed inclined defects associated with scale (Figure 4a). No internal oxidation was observed around these defects. Entrapped scale was observed at the end of defects (Figure 4b). Microstructure of all the rebar samples at edges showed tempered martensite; whereas at core ferrite pearlite microstructure along with widmanstatten pattern was observed (Figure 4c and 4e).
Figure 4a: Un-etched microstructure revealed inclined defects associated with scale.
Figure 4b: Etched microstructure revealed inclined defects associated with scale.
Figure 4c: Ferrite and pearlite in the core of the rebar sample.
Figure 4d: Macro dual zoom photographs of etched transverse micro specimens revealed uniform rim pattern.
Figure 4e: Tempered martensite in the edge of the rebar sample.

Discussion
On visual observations of rebar sample (U-bend) longitudinal surface defects were observed in both the tension and compression zone. On appearance, metal folded over the rebar surfaces at an angle. Microstructure revealed scale entrapment in defects. Uniform rim pattern was observed in sample. The core comprised of ferrite pearlite matrix with widmanstatten microstructure; whereas at edges tempered martensite was observed. Depth of surface defect was 0.16 mm in case of location no.1; whereas 0.25 mm and 0.09 mm in case of location no.2. Depth of defects was within 1% of diameter. The above observations indicated that the defect was of lap type. Laps are discontinuities in the material which generally run more or less at an angle to the surface of the rod. They are usually quite long and of uniform shape they nearly always run longitudinally in the rod, one or more similar defects occurring uniformly distributed at the periphery of the wire rod. Sometimes, they also appear as parallel double lines.
Pass overfilling is the most frequent cause of laps when material which is forced out into the roll gap folds over and is rolled into the rod surface during subsequent passes. Passes are overfilled when too large a reduction is attempted, or the wrong pass design is used. Laps can also occur when the roll passes in not adequately filled so that the lean place in the section falls over in the roll pass. Laps on only one side of the section can also due to badly aligned guide. In multi-stand continuous mills, over-filled bar ends cannot be completely avoided in the roughing passes, even with careful adjustment of the mill and these can cause laps. Non-uniform spread associated with severe fluctuation in rolling temperature can also give rise to lap. Laps can usually be distinguished from cracks by the typical configuration and arrangement of the defect, such as parallel double lines or discontinuities in the material distributed uniformly over section and following the circumference. It can be prevented by proper schedule changes of guides and passes, right operating practice of guide setting and alignment.
Conclusion
The rebar failed during bending operation due to presence of surface defect. The above analysis shows that the surface defect is of lap type which was originated during hot rolling operations.
References
- Souvik Das, Jitendra Mathur, Tanmay Bhatta charyya, Sandip Bhattacharyya (2014) Failure analysis of re-bars during bending operations. Case Studies in Engineering Failure Analysis 2(2): 51-53.
- Chakrabarti I, Bhattacharyya T, Maheshwari MD, Venugopalan T, Chakravorty AK (2006) High strength rebars for the Indian construction industry. Tata Search 2: 395-403.
- (1786) IS Indian Specification for High Strength Deformed Steel Bars and Wires for Concrete Reinforcement.
- Markan RK (2005) Steel reinforcement for India, relevance of quenching & tempering technology. Steel World 4-9.
- Zaky AI, El Morsy A, El Bitar T (2009) Effect of different cooling rates on thermomechanical processed high-strength rebar steel. J Mater Process Technol 209: 1565-1569.

Top Editors
-

Mark E Smith
Bio chemistry
University of Texas Medical Branch, USA -

Lawrence A Presley
Department of Criminal Justice
Liberty University, USA -

Thomas W Miller
Department of Psychiatry
University of Kentucky, USA -

Gjumrakch Aliev
Department of Medicine
Gally International Biomedical Research & Consulting LLC, USA -

Christopher Bryant
Department of Urbanisation and Agricultural
Montreal university, USA -

Robert William Frare
Oral & Maxillofacial Pathology
New York University, USA -

Rudolph Modesto Navari
Gastroenterology and Hepatology
University of Alabama, UK -

Andrew Hague
Department of Medicine
Universities of Bradford, UK -

George Gregory Buttigieg
Maltese College of Obstetrics and Gynaecology, Europe -

Chen-Hsiung Yeh
Oncology
Circulogene Theranostics, England -
.png)
Emilio Bucio-Carrillo
Radiation Chemistry
National University of Mexico, USA -
.jpg)
Casey J Grenier
Analytical Chemistry
Wentworth Institute of Technology, USA -
Hany Atalah
Minimally Invasive Surgery
Mercer University school of Medicine, USA -

Abu-Hussein Muhamad
Pediatric Dentistry
University of Athens , Greece

The annual scholar awards from Lupine Publishers honor a selected number Read More...


